#also rip whenever their videos are 720p bc i do not have much to work with quality-wise lmao
Explore tagged Tumblr posts
Text


#nick sturniolo#nicolas sturniolo#sturniolo triplets#nick sturniolo gif#sturnioloedit#nsturnioloedit#nicksturnioloedit#we did a spelling bee! (extremely hard words) embarrassing#also rip whenever their videos are 720p bc i do not have much to work with quality-wise lmao#worse than nicotine#insistent pretext
205 notes
·
View notes
Text
"palette” gif tutorial
hi everyone!!! so i’ve gotten countless requests to make a tutorial for my lara jean gifset, more specifically this gif:
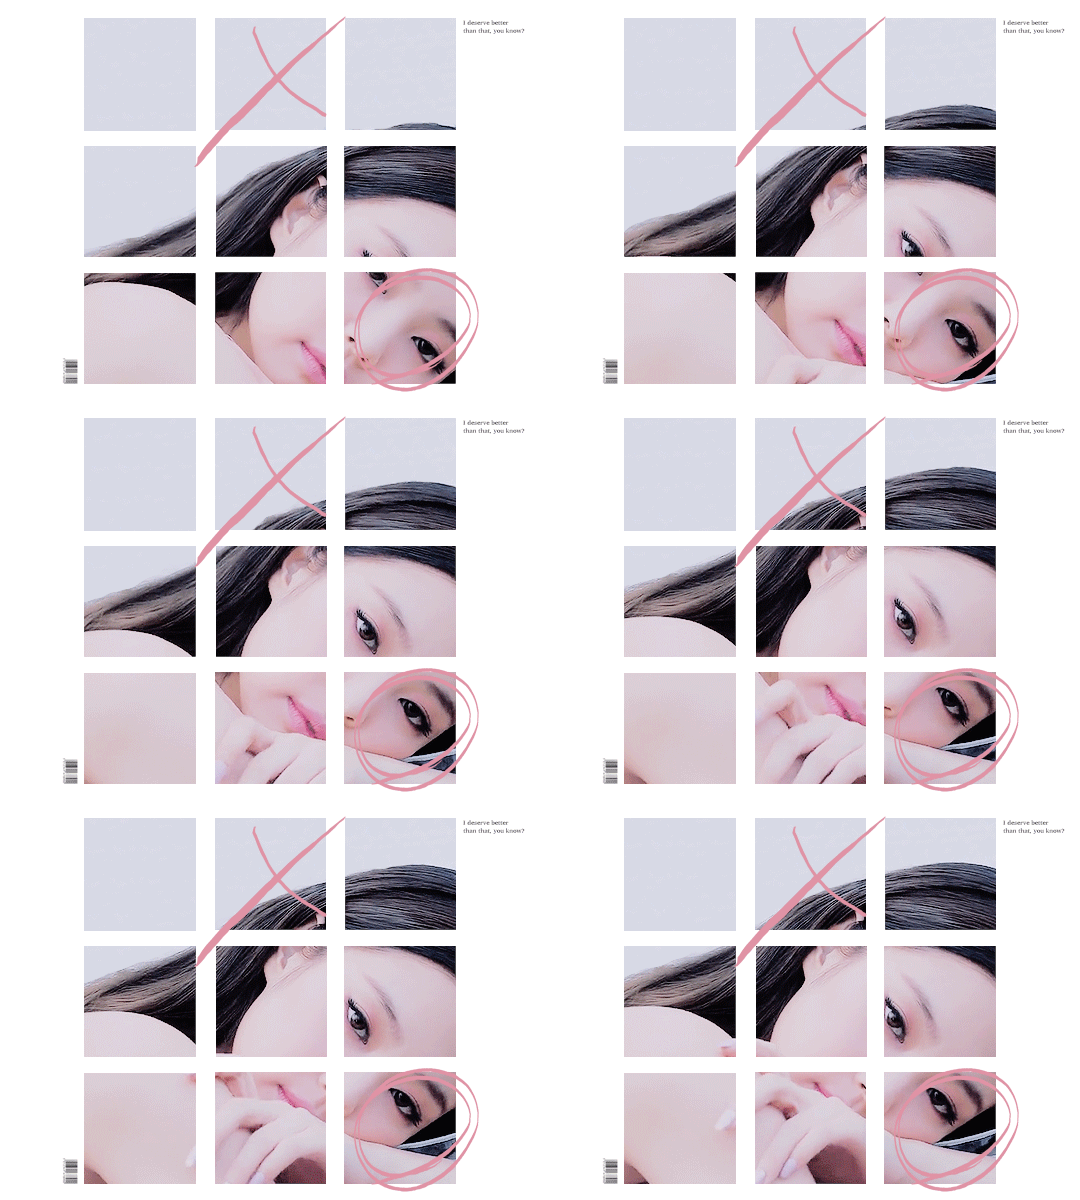
so today i’ll be showing you how i make this gif right here:
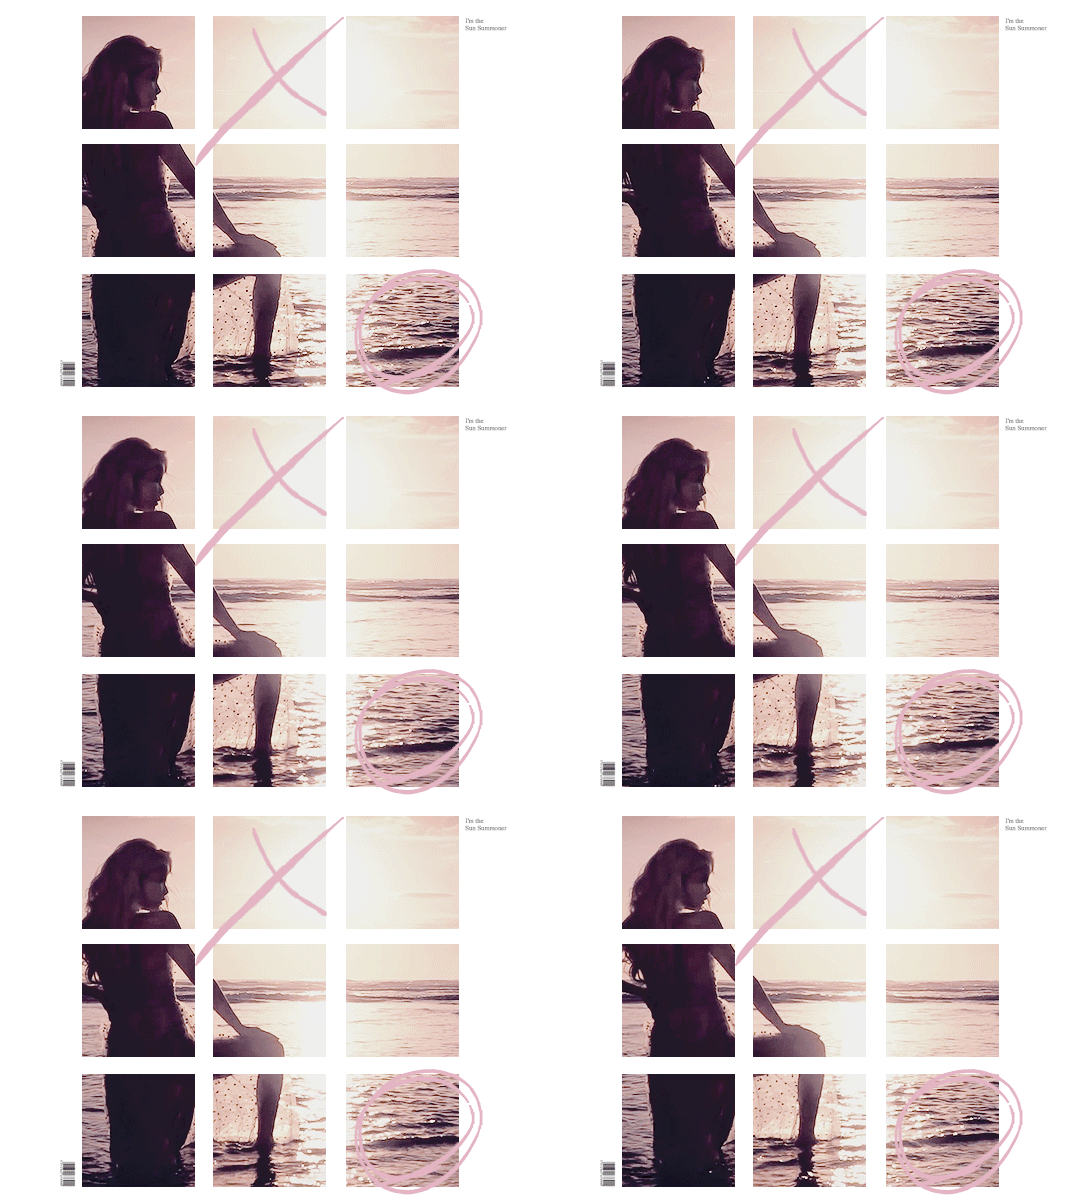
as mentioned in the original post, this whole gifset was inspired by one of my favorite mvs of all time: palette (hence the creative name lmao). i essentially used screenshots of the mv to make my own similar template to work off!
disclaimer: i suck at explaining things, so you’re all gonna have to bear with me and my 100000 screenshots and poor attempts at explaining wtf i’m doing. hopefully you can manage to understand what i’m on about!!
if you’ve never made a gif, check out this detailed tutorial i made some time ago:
how to make gifs + color gifs (this tutorial includes links to download ps)
tutorial under the cut (i’m sorry for how long this is rip)
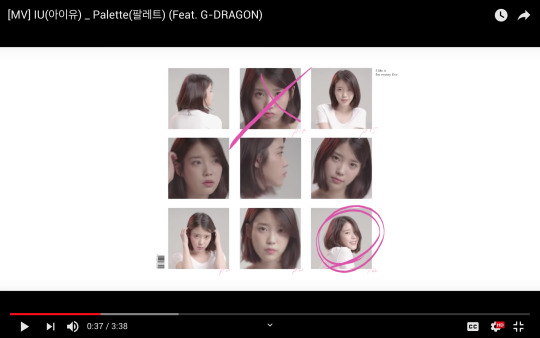
first, screenshot the mv. (timestamp 0:38)
here is my screenshot:
now, we’re gonna open ps and go to file > open to open the screenshot on there. this is my screen rn:
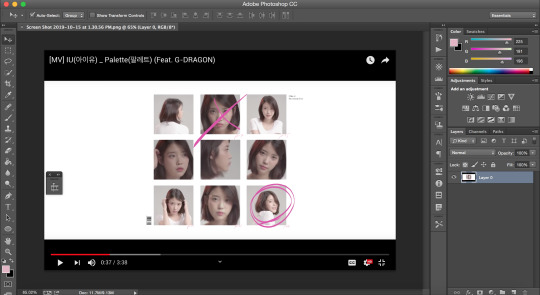
notice how my timeline is there (little box on the right side of the screenshot). we’re going to need the timeline for the gif later. if u don’t see the timeline, go to window > timeline and it should show up!!
time to crop the screenshot. using the crop tool, (left sidebar, 5th icon from the top) remove the black parts of the image (top and bottom) until all you’re left w is the white area. final product:
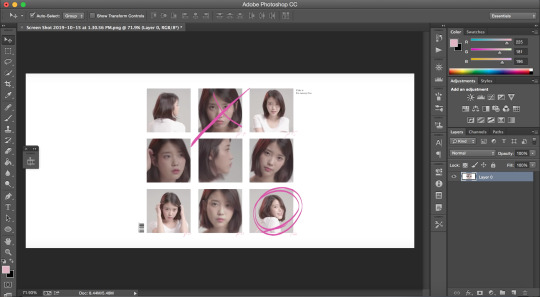
now it’s time to change the size of the canvas we’re working it so it can be the dimensions we want it to be! go to image > canvas size
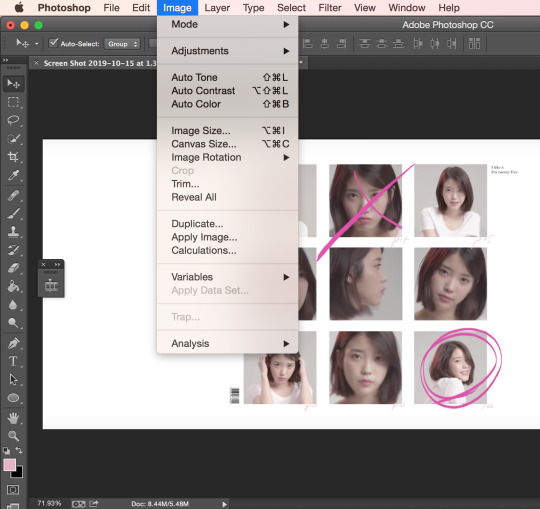
a window like this should pop up:
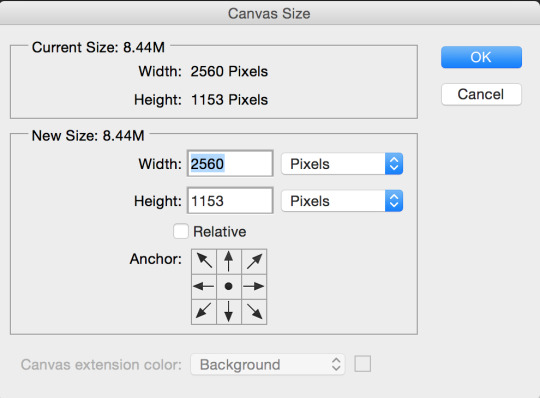
we want our gif to b 540px by 400px, so just fill that out and press ok:
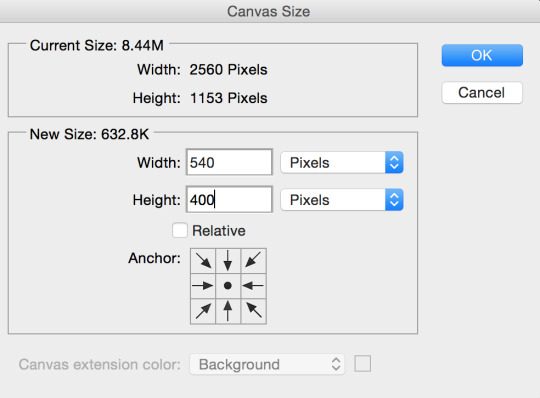
this is what your screen should look like after (aka super zoomed in):

we’re gonna fix that rn!!! making sure the layer (right sidebar) is selected (you can tell it’s selected when it’s in blue), press command + t, which will leave you with this:
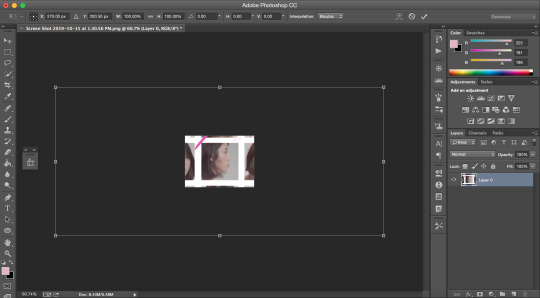
okay, so i’ve covered this before in my previous basic gif making tutorial and not much has changed since then aka i’m still shit at attempting to explain wtf i’m doing. BUT basically this part involves using the top bar (pictured below) and changing the % of the W and the H to make the image the amount of zoomed in i want it to b (if that makes sense)

again, i usually just play around w the %s, depending on how zoomed in i want my image or gif to be, its dimensions, etc. the higher the %, the more zoomed in it is. basically, putting in 50% would make it way more zoomed in than 20% and so on. for this, i’ve tried out several % and decided to use 39%, but of course you can pick the % you prefer. so write in your chosen % in these two boxes in the top bar like this:

click the checkmark at the right of the top box and voilà! this is what you should have rn:
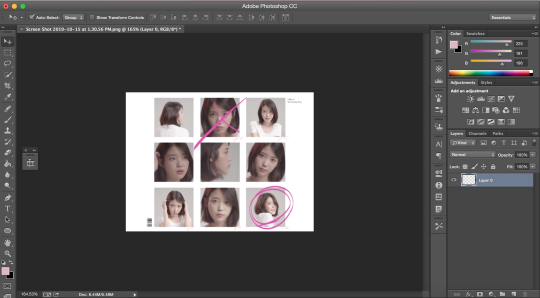
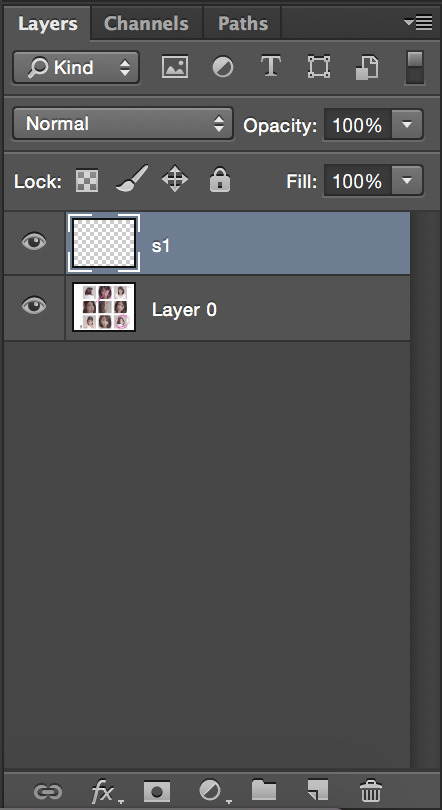
see how all the 9 squares fit perfectly inside? wow, powerful. anyway, let’s keep going djfhdkfd. now we’re going to make our own squares aka the squares in which the gif is going to be. start by creating a new layer (at the bottom of the right sidebar, the second to last icon before the trash icon). give it a name so it’s easier to keep track of: i picked s1, since this is going to be the layer where the first square is going to be (and so on). also make sure the new layer is above your image like this:
time to actually make the first square!! select the rectangular marquee tool (left sidebar, 2nd icon from the top) and select one of the squares in the image (113px by 113px) like this:

select the paint bucket tool (left sidebar, under the eraser tool) and make sure the color is set to black (#000000) before you click on the square you just selected. very important: don’t forget to have the s1 layer selected (should be in blue) when you do this or else it will fuck up.
this is what your screen should look like after:
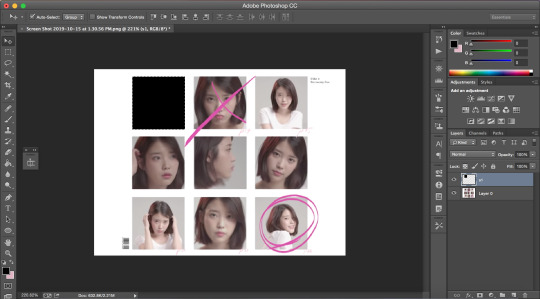
as you can see, we have one square done, but there are 8 more left. right click on your s1 layer in the right sidebar and click on duplicate layer. name that layer s2. making sure the s2 layer is selected, drag it to the place of the second square:
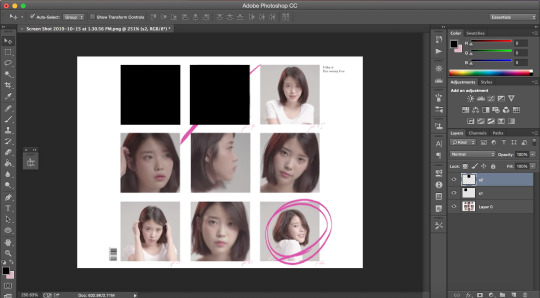
keep doing the same thing until all the squares are covered with black ones like this:
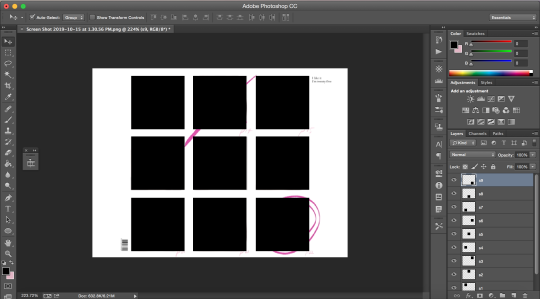
now i’m going to hide the black square layers by clicking on the little eye icon (left of layer) for each of them bc i want to include the little dark pink doodles on my gif as well, but you don’t have to, so if you don’t wanna include it in your gif, you can skip over this part!!
there are technically 3 ways you could do that (well maybe more lol but these 3 are the ones who came to mind:
method #1: use the brush tool to draw your own doodle (or trace over the existing one with a new brush)
method #2: use the magic wand tool to select the doodle and use the brush tool over your selection
or method #3: look up doodles on google and drag them onto your image
i don’t have an ounce of patience rn, so i will b using method #2. select the magic wand tool (left sidebar, 4th icon) and make sure you select the first doodle the best you can. don’t forget to make sure your screenshot (image with the doodle on it) is selected while you select the doodle or it won’t select anything!!! like this:
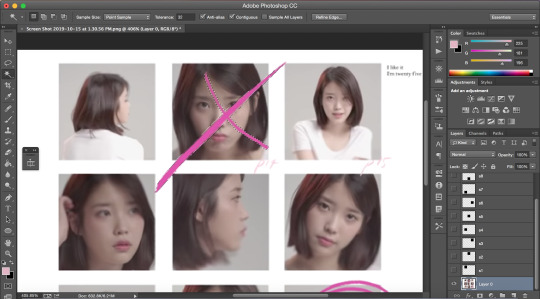
create a new layer (bottom of the right sidebar, the second to last icon before the trash icon) and again, make sure it’s above all the other layers. with your new layer selected (in blue), select the paint bucket tool (left sidebar, under the eraser tool) and pick a color (i used #e1b5c4). click on your selected doodle. this is what you should have:
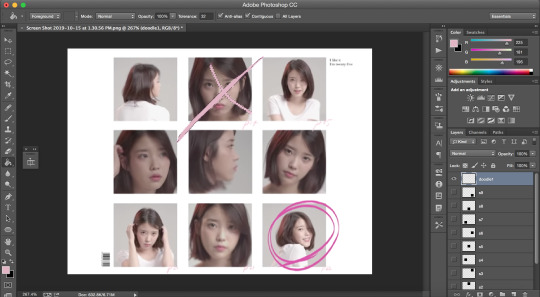
repeat for the other doodle with another layer.
final product:
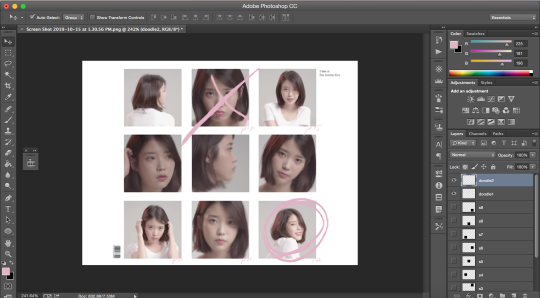
it looks a bit Rough, but hopefully you get the idea?
now we’re going to merge all the little squares into one layer of little squares. if you have doodles, remove the eye icon (left of layers) for both of them to hide them and make sure all of your eyes are there for the square layers. select the s1 layer and then the other layers up to s9 while keeping one finger on the shift button until all the square layers are selected (in blue) like this:
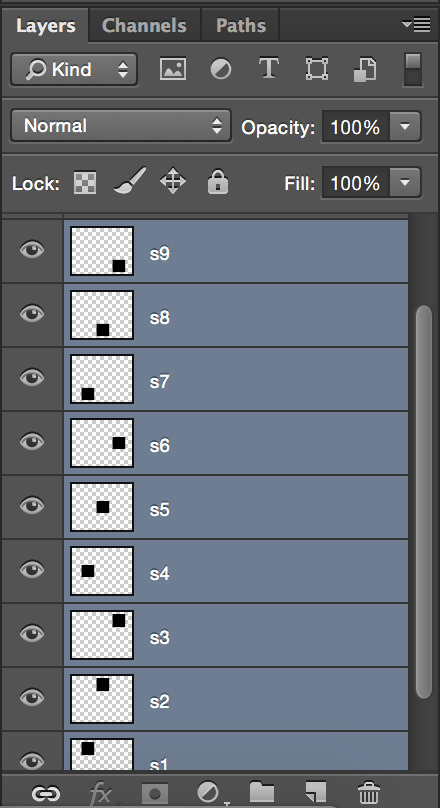
right click on the s1 layer > merge layers. all you should be left with is:
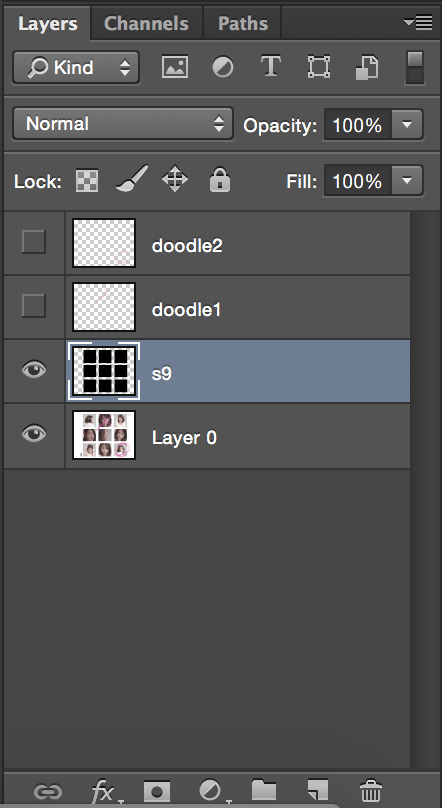
now that this is done, we need to fix the background.
create a new layer that you will drag above the screenshot (layer 0) but under the s9 layer. i named mine bg (background). i want to keep the barcode in the original screenshot, so i won’t select that part. using the rectangular marquee tool (left sidebar, 2nd icon from the top) and with the bg layer selected, draw a square at the right of the bar code so you have this:
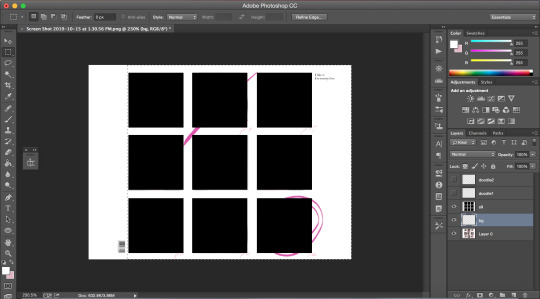
with the paint bucket tool (left sidebar, under the eraser tool) and the color set to white (#ffffff), click on the selection.
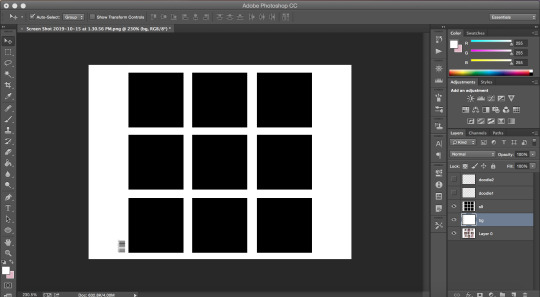
and that’s your template!!!
with doodles:
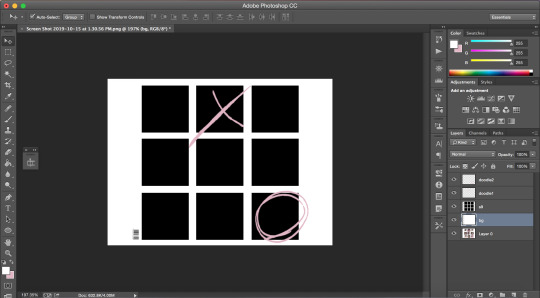
now onto making sure the gif is going to actually move properly.
click on the little arrows at the right side of the timeline to expand it until you have this:
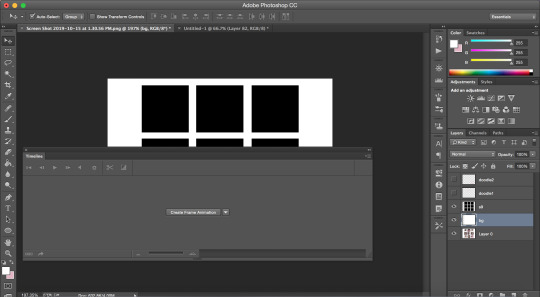
and then click on create frame animation. your screen should look like this:
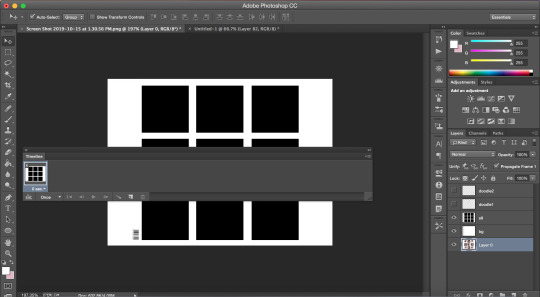
notice how it says once at the bottom of the timeline? make sure to change that to forever, or it will not play:

click on the convert to video timeline icon (the one on the left of the forever). this is what you should be left with:
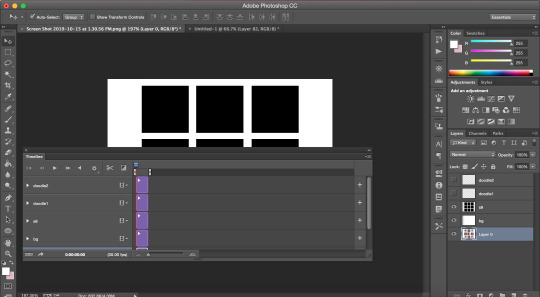
now, time to make the gif that is going to go there*
*if you have no idea how to make gif and are lost af, i suggest you check out my previous tutorial where i explained this part with more screenshots and more specifically bc i will be more vague here regarding this
also i’ve said this again and again, but remember to ALWAYS USE 720P OR 1080P FOOTAGE WHENEVER POSSIBLE FOR YOUR GIFS or else they will be grainy and extremely unpleasant to work with.
i’ll be using a video from youtube for this. i suggest converto as a converter, it works really well and allows you to download youtube videos in 720p and 1080p!! once you have your footage ready, go to file > import > video frames to layers. use the markers to select the part you wish to gif, and, once you’re happy with your selection, click ok.
to select all the frames, click on the icon on the right of the timeline (4 lines with an arrow) and click on select all frames. then, go to select > all layers in the top bar. everything should be selected (in blue) like this:
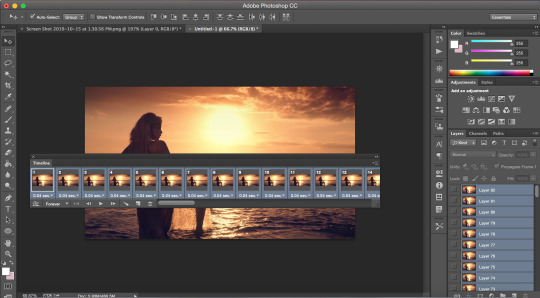
now, fixing the speed of the gif.
super helpful post explaining gif speed right here
i’ll personally be using 0.06 here.
click on one of the frames in the timeline > other. write in the speed you chose and then press ok. go to convert to video timeline icon (the one on the left of the forever).
you should have something like this:
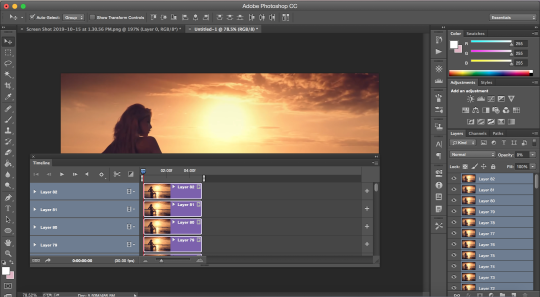
go to filter > convert for smart filters:
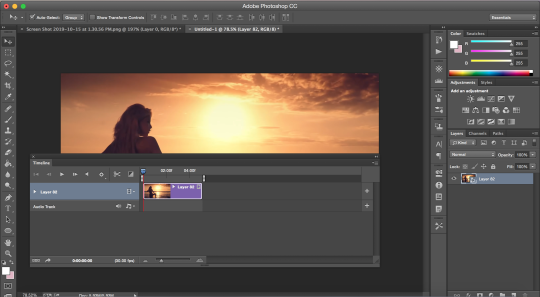
the time has come to drag your gif to the canvas:
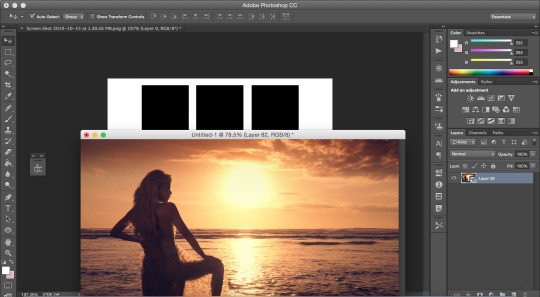
make sure the gif is above the s9 layer (layer with the black squares) like this:
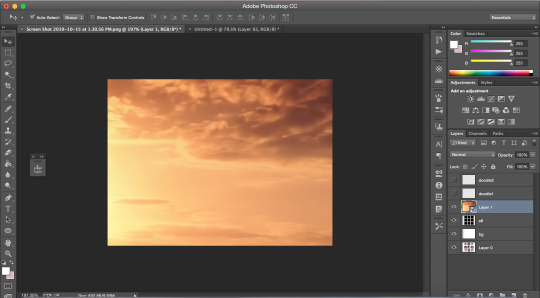
to make our gif fit inside the squares, we’re going to make sure the gif layer is selected. then, press the option (alt) button and click between the gif layer and the s9 layer to create a clipping mask (like this). this is what it does:
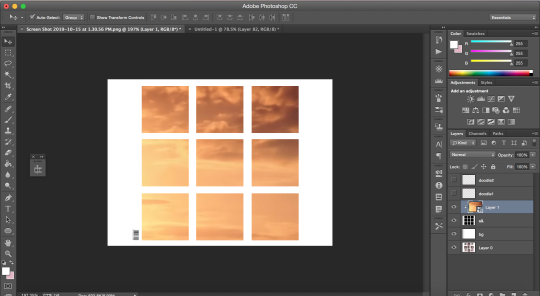
this is where i usually play around trying to find a size for my gif that looks nice. press command + t and, like we did earlier, find a % you’re happy with. i’m going to go with 20%. after moving my gif around and making it less zoomed in, it now looks like this:
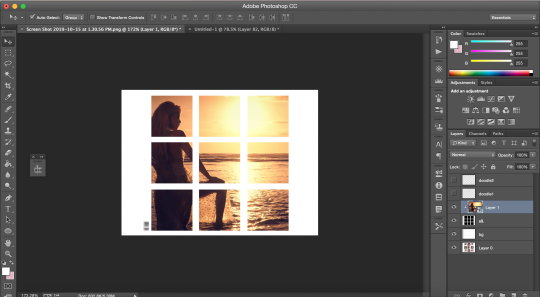
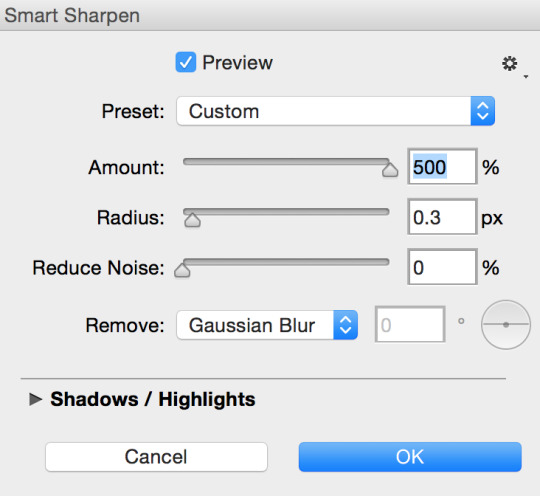
this is usually where i would sharpen my gif, so, with your gif layer still selected, go to filter > sharpen > smart sharpen, and then ok.
these are my settings:
we have to fix the length of the gif, since there’s a lovely limit on this amazing site. i suggest you pick something to gif with not much movement, or you’ll have to make it even shorter. there’s no magic formula, just try not to make it too long, especially since the gif is large in size, so the smaller the better in this situation. this is what i have:
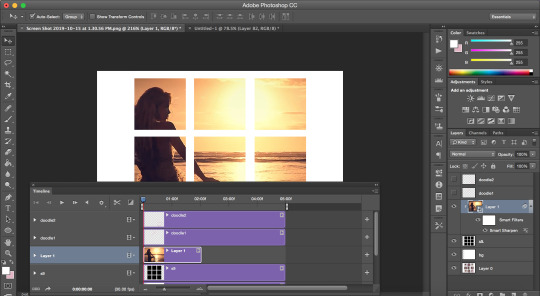
notice how the layers in the timeline are all of different lengths, so make sure you make them all the same like this:
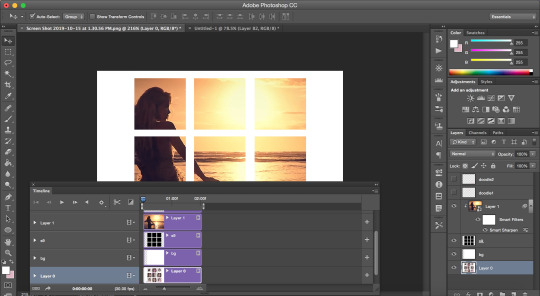
once you have a psd ready, go to file > open and when it loads, drag it onto the canvas, above the gif. i added one of my psd on mine.
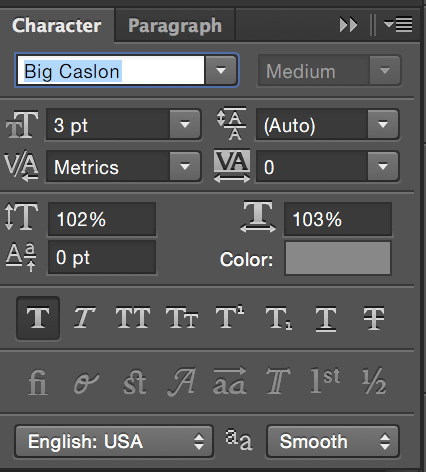
for the text on the top right, i can’t remember the exact font i used, so i picked another font different from the original.
these are my settings:
what it looks like with the psd + doodles + text:
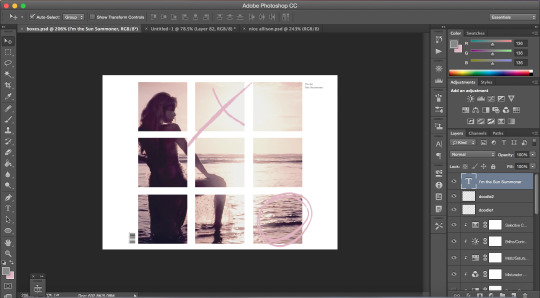
and we are DONE!!! all that’s left is to save our gif!! go to file > save for web
these are my settings:
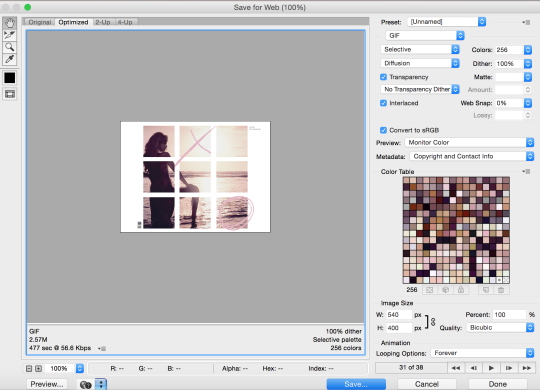
SUPER SUPER IMPORTANT: make sure your gif is set to forever in the looping options at the bottom right of the window or else your gif will absolutely not play properly!!
also, CHECK YOUR GIF SIZE (bottom left). with this website changing its gif limit every 2 seconds, better safe than sorry!!
here’s the final product:

thanks for sticking around and reading all of this!!! i hope it was somewhat helpful even though i suck at explaining how i do stuff! :)
#stupid tumblr crashed so i had to start over but here it is finally!!! sorry for how long it took!!#gif tutorial
48 notes
·
View notes